The
Magnet Commerce product editor:
Once you have decided upon the product
categories, the filters
and the variants
to use, you can start adding your products to the catalog.
You will do this through the "Add Product"
page which you can access by clicking "Catalog > Add
Product" in the Administration Panel.

| Figure:
Add a product by choosing "Catalog > Add Product"
in the Administration Panel. |
You can use this page
to add a new product to the catalog.
The "Add Product"
page is split into 4 different sections: Presentation, Pricing,
Promotion and eProducts. We will go through each one of them
explaining the process in detail.
! The
exact same sections and fields can be edited for an existing
product by choosing "Catalog > Products" and
clicking on the product's name.
Following, you can read about how
to set:
a product's presentation
a product's pricing
a product's promotion
a downloadable product
Product
presentation:
The first step of the product addition
process is to define the general presentation of the product.
This would be the product's name, code and description as
well as the categories, filters, images and attached files
assigned to it. We will go through all different fields in
the presentation page, to see how this information can be
added to your storefront.
Product Code - Availability:
At the top of the product presentation
page you are given the option to define a Product code. This
is a unique identifying code that will help you manage your
products in a simple and efficient way. The Product code can
consist of any number of characters. These can be numbers,
letters, spaces, special characters etc. You can also define
an SKU for your product (Stock Keeping Unit: A common term
for a unique numeric identifier, used most commonly in online
business to refer to a specific product in a catalog). Both
the Product code and SKU are optional.
Magnet Commerce also allows you to make the
current product unavailable to your customers simply by ticking
the 'Hide product' box. You might for example want to hide
the product because it is temporarily out of stock. Should
you wish to make the product available again, simply untick
the "Hide product" check box.

| Figure:
Editing a product's code and/or SKU - Defining product
availability. |
Product Name and Descriptions:
The next step is to fill in the fields
for describing the product. Magnet Commerce has 3 fields for
this purpose: “Product name” in which you should
provide a full name for your product, “Short description”
which is shown at pages with product lists (category page,
search results, featured products, …) and “Description”
which is shown at the product’s presentation full page.
When providing the full product description
keep in mind that a disadvantage of electronic commerce as
compared to real commerce is that buyers do not have the product
they are after in front of them. You should therefore make
any effort to give your visitors as many details as possible
and make them feel comfortable with the product they are about
to order. For this reason Magnet Commerce "Description"
editor comes with many of the powerful functionalities of
known desktop editors:
The advanced toolbar contains buttons for:
All common editing commands: "cut",
"copy", "paste", "paste from word",
"delete", "full page", "undo and
redo" actions:

Text formatting options: "bold",
"italics", "underline", "strikethrough
line", "superscript" and "subscript
text", "font color", "highlighting"
and "text alignment":
 
Insert options: "Table" insert,
"horizontal line" insert, "hyperlink"
insert and delete, "anchor" insert. Also "select
all", "position absolutely" and "visible
orders" buttons are available:

Alternatively, right clicking in the
text editor box gives a menu with numerous options for inserting,
text editing and formatting. For example, using the insert
tab, you could insert images, videos, pdf documents etc.
With Magnet Commerce you can provide product
name and descriptions in as many languages as you like! Once
you have chosen the appropriate language by clicking on the
language tab you can start adding the product name and descriptions
in that language.

| Figure:
Editing a product's name and descriptions. |
Select Categories:
You will also need to select one or more
categories under which your product will be classified. You
will do this by highlighting a category from the 'Available
Categories' list and pressing the 'Add' button. The categories
selected for the product are listed in the 'Selected Categories'
field. If you wish to delete any of them simply highlight
it and press the 'Remove' button.
! Please remember
that the category selection is obligatory. If you don't list
your product in one of your e-store's categories, the product
will not appear on your storefront!

| Figure:
Selecting the categories and subcategories under which
the product will be classified. |
Select Filters:
It is also useful to add filters to your
product. These will help your visitors locate what they are
looking for quickly and effectively by filtering the products
in your catalog. To add a filter select the filter group from
the drop down menu and then choose the appropriate filter
value from the types available. Finally click the 'Add' button
to add the filter to your product. If you wish to delete any
of the filters you have chosen, simply press the 'Remove'
button for that filter.
For detailed information on filters please see
Product
Filters section

| Figure:
Adding filters to the product to help customers find the
product faster. |
Add images:
Through this page you can also upload photos
for your product. You don’t need to use any other software
to do this neither do you need to worry about resizing the
photos; they will be re-sized automatically when uploaded.
You can upload as many photos as you wish for each product:
The first image is displayed as a thumbnail at pages with
product lists and as the main picture in the product's full
presentation page. All other images are only displayed at
the product's full presentation page as thumbnails. All these
thumbnails when clicked open a popup window with the original
uploaded picture. The default size of all thumbnails is now
set to 80x80 pixels. However you could change this setting
from "Setup > General" options.
! You don't
want to load images larger than 500 pixels since this will
slow down the process of viewing the original images!
In order to upload an image use
the browse button to select the image file (alternatively
you can explicitly type the pathname of the image in the text
box), and click the 'Add New' button. You can use the arrows
in the "Order" field to change the order of the
images (remember that the first image will be displayed as
thumbnail at pages containing product lists). Should you wish
to remove a file, simply press the "Remove" button
in the "Actions" field.

| Figure:
Uploading a product image |
Redirect Link:
You also have the option of defining a
redirect link. Define a redirect link by simply typing it
in the "Redirect link" text box.
You could choose to:
1. Not use the redirect link.
2. Redirect your customers to this link when
they click on the product name found in any of the product
list pages (category lists or search results). You could
for example use this is for building a shopping catalog.
In such a case you probably want your visitor to be redirected
to the product seller's page once the product has been selected.
3. Redirect your customers to this link when
they click on the "Add to Cart" button in the
product's presentation page. Apply this when you want your
customers to complete the purchase from a different webpage.

| Figure:
Defining a redirect link. |
Attach files:
Finally, you can attach files to your product,
such as a technical specifications word document. Your visitors
will be able to download these documents from the full presentation
page of your product.
To attach a file use the browse button to select the file
(alternatively you can explicitly type the file's pathname
in the text box), and click the 'Add New' button. You can
use the arrows in the "Order" field to change the
order the files will be appearing in. Should you wish to remove
an image, simply press the "Remove" button in the
"Actions" field.

| Figure:
Attaching files to
your product. |
Updating the storefront:
Once all the information has been added
to the product editing page, add your changes to your e-store's
front end by clicking on the "Update product presentation"
button.

| Figure:
Updating the product presentation page on your storefront. |
Product presentation on the store front:
Once the product presentation has been
updated, you can check that all your changes are present to
your storefront's product page by clicking on the "View
Shop" link, situated on the top right of the Administration
Panel page.
By updating the Canon Digital Camera presentation
page with the previous settings, the front end of our demo
e-shop appears as follows:

| Figure:
Page of the Canon
PowerShot S500 Digital Camera on the e-store's front end
after submitting the previous product presentation settings. |
Product
Pricing:
The second step when adding a product
is to define the product's pricing. Using the pricing page
you can specify the base price for your product, add extra
charges for specific variants (e.g. different colors, sizes,
guarantee options etc.) or set a discount on your initial
price. You can also define the product's weight, whether the
product is for sale, whether it is taxable and define how
many items of this product are in stock. Lets have a look
at all these settings in more detail.
The form used for setting this information is as follows:

| Figure:
Editing the product's
pricing settings. |
Base price: When
adding a product you will have to define a base price for
it. Enter the product's price in the "Base price"
text box (using the dot "." as the separator for
decimal numbers).
Note: If the product's base price is 0, the option
"Add to cart" is not available for this product!
Non-taxable product: If
you don't want to apply tax on this product tick the "non-taxable-product"
box.
Weight: You
can also set the product's weight by typing it in the "Weight"
text box. This will be used for calculating the shipping costs.
Product is for sale:
To define that the product is for sale, tick in the
"Product is for sale" box.
Note: If a product is not for sale, the option "Add
to cart" is not available for this product!
Stock:
Define the number of items in stock. This field is used for
setting the stock only
if you don't use variants that affect the product stock
for this product (see following section). If you do use variants
which affect the product stock, this field has no effect,
and you will need to use the stock
tab for setting the product stock.
When you first insert a product, its stock is set to 9999
(unlimited). Change this number to a positive digit if your
product is in stock, or 0 if out of stock. You can also use
a negative digit, which is important if backorders are allowed.
Variants:
Here you can set the variants (color, sizes etc.) that your
product is available in. Simply select the variant group from
the "Group" drop down menu and then a specific variant
from the descriptions available. You can also choose "All"
from the description drop down menu to insert all variants
in one go.
Remember that different variants of a product can vary in
price. For example a camera that comes with a '2 or more years'
guarantee will be more expensive than the '1 year' option,
so you can set the additional cost by typing it in the "Extra
charge" box. You have two options for setting the additional
price, a percentage of the base cost, or a simpler fixed price.
Just choose the appropriate format from the "Extra charge
is" drop down menu.
It is also useful to display the different variants by adding
thumbnails so people can clearly see any differences. Your
customers are more likely to purchase if they can see the
product they are buying and differences with other similar
items.
Once you have set a product variant, any surcharges and images
click the "Add New" button. There is no limit to
the number of variants you can add to a product. But you don't
want to add too many as this could make ordering complicated!
You can change the order in which the variants
will appear on your storefront by using the buttons under
the "Order" list. Click on the "Remove"
button under the "Actions" list to remove any variants
you don't want to keep.
Finally, you can easily add new variant categories by clicking
on the "manage product variants" link. For more
information on product variants, please have a look at the
Product
Variants chapter.
! Variant
groups can affect or not affect the product stock (e.g. 'Size'
might affect stock but 'Guarantee options' wouldn't). If you
introduce or delete variants that affect stock, the current
stock status of your product will change. This happens because
the stock status differs for every variant combination and
some (or all) variant combinations will be reproduced. The
stock of the new combinations will be set to either 9999 (when
you introduce) or 0 (when you delete).
Discounts:
If you wish to add a new price on an existing product simply
type it in the "New Price" box. This will now be
the new valid price for the product. At the front end the
user will see the normal price in strikethrough format while
the new price is shown underneath it. You can also control
the color of the discounted price from the design tab.
Updating the storefront:
Remember to update your storefront with the current changes
by clicking on the "Update Product Pricing" box.
Pricing settings on the store
front:
Once the product pricing has been updated,
you can check that all your changes are present to your storefront's
product page by clicking on the "View Shop" link,
situated on the top right of the Administration Panel page.
By updating the Canon Digital Camera presentation
page with the previous settings, the front end of our demo
e-shop appears as follows:

| Figure:
Page of the Canon
PowerShot S500 Digital Camera on the e-store's front end
after submitting the previous pricing settings. |
Product
Promotion:
Promotion is a very important tool for
your e-store. You may wish to promote some specific products
or add unique title and description tags on every product
page of your storefront.
The "Promotion" tab is used for setting up a product's
promotion features. This tab is accesible when adding a new
product using the "Catalog > Add Product" tab,
or when editing a product's page (choose "Catalog >
Products" and click on a product to edit it).
On the Magnet Commerce promotion page you can:
- add featured products on home and category
pages,
- promote related products on every product
page,
- add unique title and description tags to
every single product page of your storefront.
Featured
Products:
On top of the product promotion page you
will find four checkboxes. Choose any of them in order to
promote your product.

| Figure:
Editing the product's
promotion page. |
Featured on homepage:
tick this check box to place the current product as a featured
product on your homepage.
Featured on category
page: tick this box to place the current product
as a featured product on the category pages it belongs.
Best seller:
use this box to tag the product as a best seller.
New release:
use this box to tag the product as new.
Related
products:
Magnet Commerce also allows you
to set up as many related products as you like in every product
page. You can do this by pressing the "Add related products"
button:

| Figure:
Adding related products. |
Choose as many related products as you
like from the "Select Related Products" pop up window.
When you are done, place them in the order you prefer by using
the "Order" buttons:
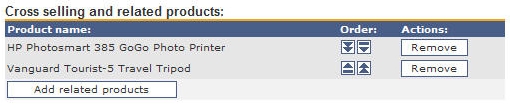
| Figure:
Once you add all related products, place them in the
order you prefer by using the "Order" buttons. |
 |
The pop up window will show
all the products available in your e-store catalog. To
only view the products of a specific category, type the
category name in the text box at the top of the window
and press the "Search" button. Once you have
found the product you want to select, click the "Add
Related" link to add the product to the related products
list. |
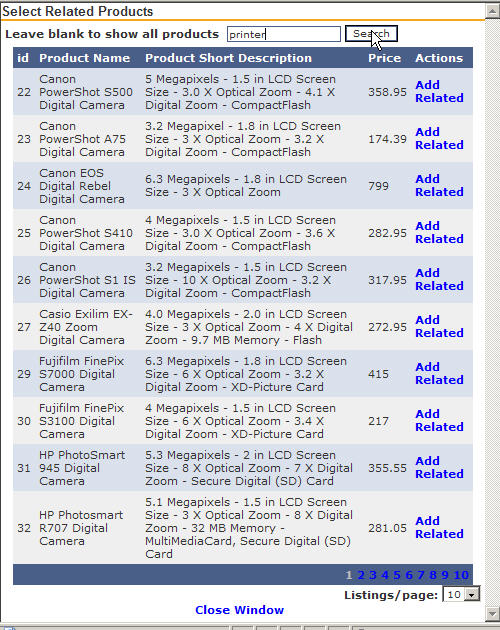
| Figure:
Selecting Related
products. |
Unique
title and description tags:
When you add a new product on your Magnet
Commerce store, the product title tag (the title appearing
on the browser when the product page opens) is automatically
set to the product's name followed by your store's title.
Additionally, the product's short description and name get
added as metatags on your store's product page. These metatags
will provide better information about your product to search
engines.
With Magnet Commerce you can overwrite the default title and
metatags of each product, using the following form in the
promotion page:

| Figure:
Editing the product's
title and description tags. |
Product page title tag:
When adding a product, the product's title
tag (the title appearing on the browser when the product page
opens) is automatically set to the product's name followed
by your store's title (set in the "Setup > General"
tab).
Use this field to define a new title tag for you product.
Product's description metatag: When
adding a product, the product's short description (set in
"Catalog > Add Product > Presentation" tab)
is automatically added in a "description" metatag
within the html code of the product page.
You can use this field to edit the contents of the "description"
metatag. This tag is picked up by search engines, so this
is a way to provide search engines with the exact information
you want for your product.
Product's keywords metatag: When adding
a product, the product's name (set in "Catalog > Add
Product > Presentation" tab) is automatically added
in a "keywords" metatag within the html code of
the product page.
Use this field to provide a comma separated list of keywords/phrases
for the product's "keywords" metatag. Just like
the "description" metatag, the "keywords"
metatag is picked up by search engines and will help increase
your rankings.
|
Think of all possible queries
potential customers would place in a search engine when
looking for your product! But make sure you also add these
keywords in the text appearing on the product page as
you might be penalised by search engines otherwise. |
|
for multi language stores:
These tags are automatically created from the product's
name and short description that is initially
saved for each language (the first time you click
"Update Product Presentation" when adding
a new product). If you translate the product's name
and short description to a language at a later stage,
the content of the tags in this language won't get updated
automatically - you will have to translate these as well!
For this reason, it is better to provide the correct name
and short description for all languages the first time
you save a product's presentation features. |
Updating the
storefront: When
you have finished setting up your products promotion features,
update your storefront with the current changes by clicking
on the "Update Product Promotion" button.

| Figure:
Saving the products
promotion features. |
Promotion features on the storefront:
Once you have set up your product's promotion,
you can check your storefront to view your changes. Go to
your storefront by clicking on the "View Shop" link,
situated on the top right of the Administration Panel page.
Indeed, if we update the Canon Digital Camera
promotion page with the previous settings, we will see the
product featured on the home page as well as the category
page:
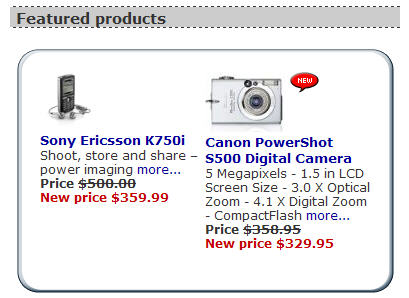
| Figure:
Featured products
appearing on the e-store's homepage. |
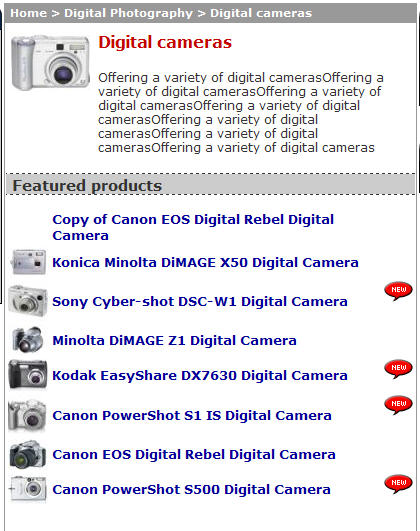
| Figure:
Featured products
appearing on the e-store's "Digital Cameras"
category page. |
In the full product page, the related products
appear on the right column of the product page:

| Figure:
Related products appearing
on the product's storefront page. |
The browser's title bar is the one we have
set in the product title field:

| Figure:
Product page title.
|
Finally the title tag, the "description"
and the "keywords" metatags appear in the html source
code of the product page:

| Figure:
Metatags appearing
in the product page source code. |
Downloadable
Products (eProducts):
Magnet Commerce allows you to sell electronic
products on your online store. These are downloadable goods
such as songs, e-books, images, zip files etc. Once an eProduct
has been ordered and the payment has been received, the customer
will be given a link from which the eProduct can be downloaded.
Setting
up an eProduct:
To setup a downloadable product, use all
product tabs (presentation, pricing, promotion) as described
above and finally go to the "eProduct" tab to upload
the file you wish to deliver when the eProduct is purchased.
The eProduct tab contains the following form:

| Figure:
Setting up a downloadable
product. |
Click "Browse" to choose the
file you want to deliver when the product is purchased.
Once an eProduct has been ordered and the order status has
changed to "Payment received" (see next section)
, an email is automatically sent to the customer, with a link
from which the product can be downloaded. Using the drop down
menu on this form you can define how long the link will be
active for. The timer starts the minute the email is sent
to the customer. After the designated time passes the link
will no longer work and the customer will not be able to download
the product.
When you have finished with the form click "Add / Update
eProduct" to upload the file. This can take a while depending
on the size of the file you are uploading. When the upload
has finished, a message will appear informing you that the
file has been uploaded.

| Figure:
When the upload has finished, a message will appear
informing you that the file has been uploaded. |
Of course you can upload a different file
or change the expiry period at any time; simply change the
relative data and click "Add / Update eProduct".
Finally, click on "Delete eProduct" to remove the
downloadable file.
Ordering a
downloadable product:
Downloadable products can be ordered just
like any other product. Once the payment of the order has
been successfully submitted, you will need to go to the "Orders"
tab of your administration area, edit the specific order and
change its status to "Payment received":

| Figure:
Setting the status of an order to "Payment received".
|
When you click "Submit" an email will be automatically
sent to your customer, with a link through which the product
can be downloaded.
! This link
will only be active for the period you have defined on the
product's eProduct tab (see above section).
Summary:
 Add a new product by choosing
'Catalog > Add Product' in the Administration Panel. Add a new product by choosing
'Catalog > Add Product' in the Administration Panel.
The 'Add Product' page
is split into 3 different sections: Presentation, Pricing
and Promotion.
Using the Presentation
form, the following product information can be added to your
storefront: product code, availability, descriptions, categories,
filters, attached files, images and redirect links.
Using the pricing form
you can set the base price, any surcharges as well as discounts
for your product. Additionally you can add variants for your
product (different sizes, colors etc.) define the stock status
and the weight of the product.
Using the Promotion page
when adding a product ('Catalog > Add Product'), you can
feature the current product on your e-store's product page
and on the category page(s) it belongs to. You can also tag
it as "New" or "Best Seller". Finally,
you can add related products to the product page, and change
the product page title tag and the "description"
and "keywords" metatags.
Using the eProducts page
you can upload files for downloadable products (eProducts).
The exact same sections
and fields can be edited for an existing product by choosing
"Catalog > Products" and clicking on the product's
name.
|